Fan Xpert in Armoury Crate software
Fan Xpert is very useful tool built by ASUS. Built into Armoury Crate (or AI Suite 3 on older boards), it gives you precise, intelligent control over fan connected to your motherboard. Whether you want a whisper-quiet PC when it’s idle or maximum airflow during an intense gaming session, fan Xpert is the tool to handle it.
This guide covers everything: what Fan Xpert is, how to install it, every control mode explained in detail, how to tune your fans like a pro, and how to fix the most common problems
What You’ll Learn In This Guide
What Is Fan Xpert?
Fan Xpert is ASUS’s dedicated fan management software. Its current version, Fan Xpert 4 can detect supported fan connected to your motherboard’s header. It can test their minimum and maximum speeds and intelligently suggests the fan speed levels under different thermal loads.
Default fan curves into your BIOS are built to work with different systems, fan Xpert fine tunes them to best match your hardware.
Fan Xpert 4 vs. Older Versions
ASUS has released several versions of Fan Xpert over the years. Here is how to know which applies to you:
Version | Where to Find It | Compatible Hardware |
|---|---|---|
Fan Xpert 4 (in Armoury Crate) | Armoury Crate → Fan Xpert tab | Intel 600 series, AMD AM5 and newer |
Fan Xpert 4 (in AI Suite 3) | AI Suite 3 → Fan Xpert module | Older Intel and AMD motherboards |
Fan Xpert 2 / 3 | Older AI Suite versions | Legacy ASUS motherboards |
► Key Rule: Do not install both Armoury Crate and AI Suite 3 on the same PC. They will conflict with each other. Use only the one that matches your board.
How to Install and Access Fan Xpert
Step 1: Install Armoury Crate
If you haven’t installed Armoury Crate yet, download it from ASUS support page. Run the installer and let it complete fully.
Step 2: Install the Fan Xpert Module
If Fan Xpert does not appear, ASUS provides an installation option through Armoury Crate’s Update Center.
Step 3: Open Fan Xpert
With the module installed, open Armoury Crate from the Windows Start menu. Look for the Fan Xpert tab in the left sidebar or within your motherboard’s device panel. Clicking it opens the full fan control interface, listing all detected fan headers.
Auto Tuning: The First Thing You Should Do
Before changing any manual settings, run Auto Tuning. This is the single most important step and takes only about 3 minutes.
What Auto Tuning Actually Does
Auto Tuning is a calibration process that tests each connected fan one by one. ASUS recommends running Fan Tuning before using certain Smart Mode options, such as Extreme Quiet Mode.
Fan Control Modes Explained
After Auto Tuning, you can apply a global preset to all fans at once, or configure each fan individually. Here is a breakdown of every mode available.
Global Preset Modes
These four modes apply a single speed profile to all detected fans simultaneously. You can select them directly in Fan Xpert or from the Fan Speed module in Armoury Crate’s Control Panel.
Mode | Fan Behavior | Best For |
|---|---|---|
Silent | Fans run as slowly as possible, | Browsing, office work, light loads |
Standard | A balanced curve — fans ramp up moderately as temperature rises | General everyday use |
Turbo | Fans ramp up aggressively, prioritizing cooling over noise | Long gaming sessions, video encoding |
Full Speed | All fans run at 100% RPM at all times | Maximum cooling, stress testing, short bursts |
► The appropriate preset depends on your hardware, workload, temperature and noise requirements.
Per-Fan Control Modes
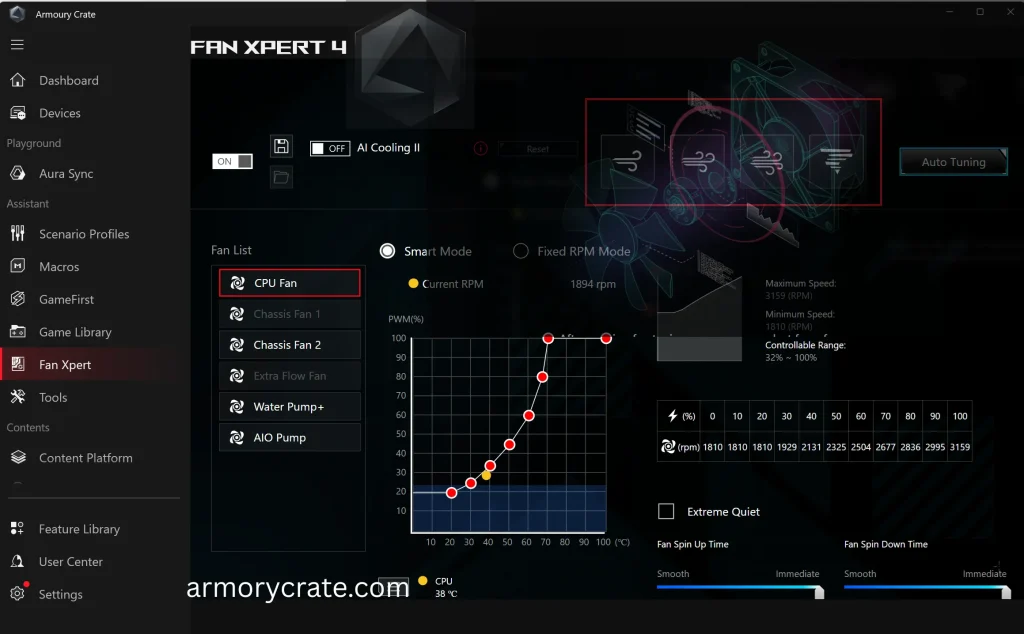
You are provided with the opportunity to have customised fan settings. Click a specific fan in the fan list (e.g., CPU Fan, Chassis Fan 1) to access per-fan settings.
Smart Mode
Smart Mode gives you a fully custom fan curve. You drag control points on a temperature-vs-speed graph to define exactly when and how fast each fan spins.
Key Smart Mode options:
- Fan Acceleration Time: How quickly the fan ramps up when temperature rises. A shorter time = faster response; longer = smoother, less reactive.
- Fan Deceleration Time: How slowly the fan ramps down when temperature drops. Prevents rapid speed cycling.
- Extreme Quiet Mode: Limits the fan’s maximum speed to reduce noise. Must run Auto Tuning first to enable this option.
- Fan Stop: When enabled alongside Extreme Quiet Mode, fans will completely stop when they would otherwise drop below a minimum stable RPM. Useful for near-silent operation at idle.
Fixed RPM Mode
Fixed RPM locks the fan to a single speed regardless of system temperature. You drag a slider to set the target RPM.
► Caution: Avoid setting a fan speed that is unnecessarily high or too low for your hardware. ASUS warns that inappropriate fan speeds can affect performance or cause overheating.
AI Cooling Mode
AI Cooling is an intelligent mode that monitors your system’s performance state in real time. When your system reaches a stable load (e.g., a game running at a consistent frame rate without big spikes), AI Cooling reduces fan speeds to lower noise, because the thermal situation is predictable and stable.
When load becomes volatile or temperature climbs, AI Cooling ramps fans back up. The goal is silence when you can afford it, cooling when you need it.
Compatibility note: AI Cooling is a supported feature on certain ASUS motherboards. When enabled, it can reduce fan speed during stable system loads to reduce noise. Availability and supported fan headers depend on the motherboard.
Temperature Sources: Multi-Sensor Fan Control
One of the exciting features of Fan Xpert is to link fan’s speed to multiple temperature sensors simultaneously.
By default, most fan curves are programmed to respond to a single sensor that monitors the CPU temperature. In a modern system, the CPU is not always the hottest part.
How to Set Multiple Temperature Sources
These four modes apply a single speed profile to all detected fans simultaneously. You can select them directly in Fan Xpert or from the Fan Speed module in Armoury Crate’s Control Panel.
- In the Fan Xpert fan list, click the temperature source icon next to a fan (e.g., Chassis Fan 2).
- A temperature source menu appears. You can select up to three sources: for example, CPU, GPU, and M.2.
- Fan Xpert will monitor all selected sources and adjust fan speed based on whichever sensor reads the highest temperature at any given moment.
This is especially useful for case fans in a build with a hot GPU: instead of the case fan ignoring GPU heat entirely, it will respond to GPU temperature the moment that becomes the dominant heat source.
► Pro Tip: For radiator fans on an AIO cooler, set the source to CPU temperature only. For case exhaust fans, consider linking to both CPU and GPU temperatures for comprehensive coverage.
Fan Xpert vs. BIOS Fan Control
Your motherboard’s BIOS also has fan control — so why use Fan Xpert at all?
Feature | BIOS Fan Control | Fan Xpert 4 |
|---|---|---|
Accessibility | Requires reboot to access and change settings | Adjustable in Windows at any time |
Per-fan granularity | Yes, but limited curve points | Yes, with more curve points and acceleration/deceleration control |
Multi-sensor support | Limited, usually one source per fan | Up to 3 temperature sources per fan |
AI Cooling | No | Yes (supported boards only) |
Auto Tuning | Motherboard-dependent | Yes |
Real-time monitoring | No | Yes — live RPM and temperature graphs |
Fan Stop | Available on some boards | Yes, with Extreme Quiet Mode integration |
Troubleshooting Common Fan Xpert Problems
Fan Xpert Tab Is Missing in Armoury Crate
This is the most common issue and almost always means the Fan Xpert module has not been installed.
How to fix it:
If the option still doesn’t appear, verify your motherboard is on the supported list: Intel 600 series or AMD AM5 and newer. Older boards require AI Suite 3 instead.
2. A Fan Is Not Detected
If a fan connected to your motherboard doesn’t appear in Fan Xpert:
How to fix it:
3. Fan Speed Isn’t Responding to Changes
If you change settings in Fan Xpert but the fan speed doesn’t change:
How to fix it:
► DC vs PWM: Check whether the fan and motherboard header use PWM or DC control and make sure the header is configured appropriately for the fan.
4. Auto Tuning Fails or Freezes
If Auto Tuning gets stuck or fails to complete:
How to fix it:
5. Fans Are Louder After Enabling Fan Xpert
This can happen if Fan Xpert’s default curve after tuning is more aggressive than what the BIOS was using before. To resolve:
How to fix it:
6. AI Cooling Option Is Greyed Out
AI Cooling is only available on specific ASUS motherboards. If the option is greyed out, your board simply does not support this feature. It also works only with designated fan headers, so check your motherboard manual to see which headers are supported.
Fan Xpert in AI Suite 3 (Older Boards)
If you have an older ASUS motherboard that predates the Intel 600 / AMD AM5 series, Fan Xpert 4 is available in AI Suite 3 instead of Armoury Crate. Older compatible ASUS motherboards may use Fan Xpert 4 through AI Suite 3. The available controls can vary by motherboard and software version.
To use it, open AI Suite 3 in Windows, select the Fan Xpert 4 section from the left panel, and run Auto Tuning by following the steps explained in this guide.
► Important: Do not install both AI Suite 3 and Armoury Crate on the same system if they both try to control fans. This causes software conflicts and unpredictable fan behaviour. Use the correct tool for your board generation.
Final Thoughts
Fan Xpert 4 provides fan tuning and control for supported ASUS motherboards through Armoury Crate. Start with Fan Tuning, then use the available preset or Smart Mode controls according to your hardware and cooling needs.